Subscribe For Free Updates!

We'll not spam mate! We promise.

Sunday 6 September 2015

Yu YuPix Compact Printer for Android, iOS Launched at Rs, 6,999


YUPIX-OVERVIEW

Micromax's Yu Televentures, after launching few smartphones and a fitness band under its 'Yu' brand, over the weekend launched a portable printer, the YuPix. The portable compact printer will be available to purchase from Amazon India starting Monday at Rs. 6,999.The YuPix pocket sized printer, as per the firm, can print an image under 60 seconds and has an image transfer speed 10 times faster due to the inbuilt Wi-Fi and NFC connectivity. Compatible with both Android and iOS devices, the printer is said to feature a 'unique' cartridge which does not require a cleaning roll and has an integrated ink ribbon and photo paper. It can print up to 10 continuous copies. The device is also claimed to be water and fingerprint resistant.The compact printer can print photos in 2.1x3.4-inch size with a printing resolution of 291 dpi. The device is said to use Dye Sublimation technology to print photos. Measuring 2.99x6.01x0.94 inch, the YuPix weighs 273 grams and is backed by a 750mAh battery. Android users can also download the YuPix app from Google Play to wirelessly sync their devices with the printer.Although it is good to see the smartphone maker entering new markets other than smartphones and fitness bands, there are chances that YuPix might fail to gain some traction and see less demand as in this modern times most of the work is done using soft copies and documents. Also, a print out of 2.1x3.4 inch might hardly be
used somewhere.

[REDMI 1S] CYNOGENMOD 12.1 [LP 5.1.1] BY ARMANI DEVS + KERNELS


Unofficial CyanogenMod 12.1 ROM for Redmi 1s is OUT !!! Lollipop 5.1.1
It is based on Cyanogenmod the Android Open Source Project with extra contributions from many people within the Android community. It can be used without any need to have any Google application installed. Linked below is a package that has come from another Android project that restore the Google parts. CyanogenMod does still include various hardware-specific code, which is also slowly being open-sourced anyway.

All the source code for CyanogenMod is available in the CyanogenMod Github repo. And if you would like to contribute to CyanogenMod, please visit outGerrit Code Review. You can also view the Changelog for a full list of changes & features.
                      https://github.com/armani-dev/androi...12.1-Changelog

Download Links With Mirrors :- 
Click here to Download [ROM] From | Google Drive | Mediafire | Dev-host | Usercloud |
Click here To Download Gapps From  | Dev-Host | Direct-Download |  

Kernels :-

Click here To Download | Xcelerate R-14 | Monster Kernel | Beast RC-6 |


Wednesday 26 August 2015

How To Install MIUI V7 Global Rom in Xiaomi Devices

INTRODUCTION
Dear MIUI users around the world,
We are extremely excited and proud to announce that we are entering a new phase of our global beta program. As Hugo announced in the MIUI 7 Global Launch Premiere on Aug 19, starting from today we will support Redmi 1S, Redmi 2, Mi 4i, Mi 3, Mi 4, Redmi Note 3G and Redmi Note 4G. MIUI 7 Global beta ROM is now available via OTA. And here are the links to download all the global beta builds!
Moving forward, we will push out global beta releases every 2 weeks on Monday before 7 pm Beijing time and we will continue to optimise our global beta program. 

ABOUT MIUI V7 ROMS AND CHANGELOGS
New - Added four new system UIs (08-14, for India only)
New - XXL text  (08-14)
New - Showtime: Set profile picture/video to show in your contacts' device when you call them (08-14, for India only)
New - Baby album: Group all baby images in one place, supports sending all images as a package and set the album as daily lockscreen.  (08-14, For India only)
Optimization - System response speed increased by 30%, battery life improved by 10%. 
New - Quick OTP(For India only)
New – Smart SMS Filter (For India only)
System
Optimization - System response speed increased by 30%, battery life improved by 10%.  
Contacts
New - Contact cards: Exchange contact cards with your friend to view his/her profile picture and detailed information (08-14)
New - Showtime: Set profile video to show in your contact's device when you call them (You need to exchange contact cards with the contact first) (08-14, For India only)
Messaging

New - Added XXL text for the app (08-14)
Optimization - Searching results display the newer messages on top (08-17)
Lockscreen, Status Bar, Notification Bar
New - Added notification page fold/unfold animated effects (08-07)
New - Block notifications in notification shade by one press (08-18)
Optimization - Optimized Notification shade brightness bar interactive style (08-07)
Optimization - Optimized battery icon on status bar (08-07)
Optimization - Optimized status bar display effects when using large font (08-10)
Optimization - Optimized notifications' height when using large font (08-10)
Optimization - Optimized 'Manage notifications' page display effect when using large font (08-10)
Optimization - MiHome app icon does not show in lockscreen in Parental controls mode (08-11)
Fix - Roaming icon did not disappear in some situations (08-10)
Fix - Block button in some featured themes overlapped with clock widget (08-12)
Fix - Notes widget display error when using large font (08-12)
Fix - Pressing on toggles did not fold notification shade in Performance mode (08-19)
Home screen
New - Child mode (08-14)
Optimization - Optimized display effect of live blur (08-07)
Optimization - Optimized built-in widgets display effect when using large font (08-10)
Optimization - Optimized One-handed mode launching speed (08-10)
Optimization - Removed Settings and Security from Parental controls - Accessible apps list (08-11)
Optimization - Assistant and Google Now cannot be launched in Parental controls mode (08-11)
Optimization - Optimized prompt text when setting wallpaper in home screen editing mode (08-12)
Fix - Home screen reloaded after deep cleaning (08-11)
Fix - A specific icon displayed repeatedly when using some themes (08-21)
Themes
New - Added four default themes (08-14)
Gallery
New - Baby album: Group all baby images in one place, supports sending all images as a package and set the album as daily lockscreen. Optimization - Optimized start page images grouping method (08-19)
Optimization - Optimized baby albums' UI details (08-19)
Fix - 'No images or videos' icon showed for a moment when entering baby album (08-19)
Fix - The baby's age did not show under baby album cover when he/she is under 1 month old (08-19)
Fix - Sometimes, shared album creator's avatar did not show (08-19)
Music
Optimization - Optimized playing status bar style in playing page (08-18)
Fix - Audio settings background display error in some devices (08-18)
Settings
Fix - Sound settings page texts were cut off when using XXL text (08-18)
Browser
Optimization - Improved app cold start speed (08-14)
Optimization - Background RAM usage decreased by 15% - 30% (08-14)
Notes
New - Added XXL text for apps (08-14)
Others
New - XXL text  (08-14)
Clock / Calculator
New – When it's your birthday, the ringtone of morning alarm will change to “Happy Birthday "
Mi Credit
Optimization - Updated Mi Credits center homescreen shortcut icon (08-20)
Optimization - Optimized display effect when using XXL text (08-20)

DOWNLOAD LINKS OF BOTH RECOVERY AND FASTBOOT FLASHABLE ROMS :


SCREENSHOTS -CLICH HERE

HOW TO FLASH ROM (RECOVERY METHOD)
1) If you're using MIUI global beta ROM, please open 'Updater' app on your phone and check for the update! 
2) This OTA has not been pushed for stable ROMs yet. So if you're using stable ROM, you need to download the ROM first and flash it by yourself. 

4) Do remember to make a backup before flashing.

HOW TO FLASH ROM (FASTBOOT METHOD)
1.Download Mi Phone Flasher From here -  click to download your file
 2.Turn off the device. Press the Volume– key and the Power button at the same time to enter Fastboot mode. Then connect the device to the Windows PC/laptop via a micro USB cable.
3.Double click on the downloaded ROM file to decompress it. Open the file folder for the decompressed ROM pack, and copy its path on the computer.
4.Decompress the MIUI ROM flashing tool downloaded in Step 1, and double click on it to install (if there is security warning, select 'Run'). After installation is completed, open MiFlash.exe and paste into the address bar the ROM file folder path copied in the last step.
5.Click on the first button (circled out in yellow) to Refresh, and MiFlash should automatically recognize the device. Then click the second button (circled out in red) to flash the ROM file to the device.
7.Wait until the progress bar inside MiFlash turns fully green, which means the ROM has been successfully installed. Then your device should automatically boot to the new version.


Monday 1 June 2015

[Tool]Advanced ApkTool v4.1.0[Windows]

Advanced ApkTool v4.1.0
Introduction

The tool is not made by and i am not stealing someone's credit Advance APKTOOL is user friendly program which allows you to recompile or de-compile apks without errors this tool is for windows. i am just presenting the work to you i will give the link to his thread at end.

Main Features

1.Based on Apktool 2.0.0-RC3
2.User friendly
3.Automated Decompiling APK/JAR.
4.Automated Recompiling APK/JAR.
5.Automated Sign APK/JAR.
6.Automated Zipalign APK/JAR.
7.No need to copy META-INF folder after recompiling.
8.Sony Xperia owners won't face bootloop after recompiling framework-res.apk.
9.Lollipop  Supported. 

How To Use This Tool :-
1.Extract the downloaded file anywhere in your pc.
2.Double click on "Advanced ApkTool.exe" to start the tool.
3.Copy your framework files to the "2-In" folder & also the apk files you want to decompile.
4.Install Framework first (Install OEM specfic framework also).
5.Decompile apk, the decompiled folder can be found inside "3-Out" folder.
6.After editing Recompile it, recompiled file should be found inside "4-Done" folder.
7.If needed sign the recompiled file, it will replace the recompiled file inside "4-Done" folder.
8.You can also zipalign the recompiled file, it will replace the recompiled file inside "4-Done" folder.
9.You can wipe any folder easily by wipe folder option.
10.You can find more in more menu option.

LINKS
| Link To Developers Thread Click here |  Link To APKTOOL Click here |
| APKTOOL For Android Click here |
| Link To My Profile Click here |

Just Ping Me if u need help ;) 

Monday 25 May 2015

How To Port Rom For Mediatek devices [JELLY BEAN]

SO LETS PORTING ROMs  [JELLY BEAN]
                                      
Requirements
1.Windows based operating system
2.Kitchen [For Boot.img unpacking Repacking]
3.Notepad++
4.Stock and Port Roms

Overview 
Please Choose port rom which is of same chip-set like mt6572 to Mt6572 and same android version.. :)

Procedure:-
1.Replace these from your Stock ROM to the ROM u want to PORT!! Lets Call it "PORT"
*system/vendor
 *system/usr
 *system/lib/modules
 *system/lib/hw
 *system/lib/libncurses.so
 *system/etc/firmware
 *system/etc/vold.fstab
 *system/etc/vold.fstab.nand
 *system/etc/bluetooth

2.For Fixing Problems...
 *system/etc/permissions
 *system/etc/security
 *system/etc/audio
 *system/etc/wifi
 *system/lib/drm
 *system/lisystem/lib/soundfx
3.Now Replace the Stock Boot.img to Port ROM!
Now Open The Port ROM folder and go to META-INF/google/android and open updater-script in Notepad++
Do the same for the Stock ROM
Now In the Port ROM's Updater Script, find a line that starts with this...
format(".......
and only replace the mmcblk0p.. with the stock one!
Do the same for this line...
mount("...
For Example 

This Is Port one
format("ext4", "EMMC", "/dev/block/mmcblk0p5", "0", "/system");
mount("ext4", "EMMC", "/dev/block/mmcblk0p5", "/system");

This Is Stock One
format("ext4", "EMMC", "/dev/block/mmcblk0p3", "/system");
mount("ext4", "EMMC", "/dev/block/mmcblk0p3", "/system");Now just Replace the "mmcblk0p3" from STOCK to PORT!! 
4.Now go back to the Folder of Port ROM and You'll see 2 folders & 1 file named
-META-INF
-system
-boot.img

Now Select these three and Click Right Mouse Button and Click on 7-Zip ->> Add to Archive
Now a dialouge box should appear! Configure the Format like This:

Archive format: ZIP

Compression Level : Normal

Compression Method: Deflate

Dictoioany Size: 32k

Word Size 32

 Now Start Zipping and Push the ZIP to your Memory Card  Go to Recovery >> Install ZIP & Wipe Data

Credits
XDA DEVELOPER | LINK TO HIS THREAD |
Ace Aggarwal :P 

Thanks For Reading This

Sunday 24 May 2015

5 Best Must Have Xposed Module for Lollipop

Must Have X-posed Module For LolliPop

What is Xposed Installer
This is the installer for the Xposed framework, which is a requirement for all modules. Xposed is a framework for modules that can change the behavior of the system and apps without touching any APKs. That's great because it means that modules can work for different versions and even ROMs without any changes (as long as the original code was not changed too much). It's also easy to undo. As all changes are done in the memory, you just need to deactivate the module and reboot to get your original system back. There are many other advantages, but here is just one more: Multiple modules can do changes to the same part of the system or app. With modified APKs, you to decide for one. No way to combine them, unless the author builds multiple APKs with different combinations.
LINK  | LINK-HOW-TO-INSTALL-XPOSED-ON-LOLLIPOP |
5 Best Xposed Modules :-
GravityBox 

GravityBox is a module which primary goal is to provide the users of MediaTek platform (which is well known for not being opensource friendly)
with a tweak box to turn their vanilla Android stock ROM into custom ROM packed with additional features and tweaks.
Additionally, it should run on any device having vanilla or close to vanilla Android not diverting too much from AOSP (Android Open Source Project).

LINK FOR JELLYBEAN | LINK FOR KITKAT | LINK FOR LOLLIPOP 
XSTANA

A simple app that allows you to change your NAVIGATION BARS and STATUS BARS icon with help of root access and Xposed module

TINTED STATUS BAR


Tinted Status Bar allows you to change the status bar colour based on the currently running application.
As of BETA 5, this is done automatically for apps that have a standard Action Bar. If an application does not change the status bar colour, configure it to do so manually in the settings app
Unicon
Unicon (formerly Icon Themer) allows you to use Nova/Apex/ADW etc. icon packs on your device.You can now use any launcher you prefer (especially Stock launchers!) and still have the power to customize how your application icons look like.(Note: If your launcher is replacing the icons with their own theme, Unicon would appear to be not working). Unicon is also more consistent because the icon theme is applied throughout your device and not just confined your launcher!

| LINK |

Serajr Blurred System UI


 New preference to give drag handle bar a translucent value (status bar expanded) Fixed App Action Bar FC on some firmwares Xperia Look and Feel (Xperia devices only) Russian translations Updated French translations - thanks xda Updated Spanish translations - thanks xda 
 LINK

CREDITS
XDA DEVELOPERS
XPOSED DEVELOPERS
ME - ONLY FOR SHARING

| TIP-PLEASE MAKE A NANDROID BACKUP DONT DAMAGE YOUR PHONE I.E YOUR DEVICE |

How to Extract source code from APK

How to Extract source code from APK

Are you an Android enthusiast? Did you ever wish to customize an app to your needs? Wondered how you can get source code of an android app In this post, I will teach you how to get source code of an android apk file along with resource files like XML files, images,icons everything that is part of an apk.

Here is the method or guide showing how to do it.

What You Need 
1.Download the apk file for which you want the source code.
2.
Download Dex2jar from here
3.
Download jdgui, a java de-compiler to get .java files from .class files here
4.
Download apktool-install-windows-r05-ibot.tar.bz2 ( for windows ) and apktool1.5.2.tar.bz2 from here

Procedure
1.extract these two folders and you get 3 files. 
(Put all these files in one folder -  aapt.exe, apktool.bat and apktool.jar)
2.Copy the apk file into this folder.
3.Open CMD and change directory to the folder where you have aapt.exe and other files. 
( Press shift and right click in dex2jar folder to open command prompt there - a shortcut)
4.run this command  [apktool decode apk-file-name.apk]
5.You get All Resource files ( media files, XML files )and AndroidManifest.xml inside the folder com.test.app folder.6.Keep a copy of apk file and rename the .apk file to test.zip and extract using any unzipping soft wares.
 ( rename test.apk to test.zip and extract.).
7. You will have a folder with the zip-file name ( for example here "test").
8.Now extract dex2jar file you downloaded move the classes.dex file in test folder (from the apk you just extracted into dex2jar folder.
9.Open CMD and change directory to dex2jar folder. 
 10.Press shift and right click in dex2jar folder to open command prompt there - a shortcut)type  [d2j-dex2jar classes.dex]
11. you will get a file classes-dex2jar.jar file in dex2jar folder.12.Open jd-gui, click on File, Open and select the classes-dex2jar.jar file you got in the previous step and click on File, Save all resources and save it to file. 
Now extract that file you will get all the .java files for that apk.
Create a new folder src in  com.test.app folder you got and move the contents of folder created by jd-gui intosrc folder.
Now you have got all the resources and java files for the apk file.

Credits
X.D.A Developers

Recent apps like lollipop for JellyBean [Theme With Me]


Recent Apps Mod 
Items Required :- 
1) SystemUI.apk
2) Apktool
3) Text Editor (Notepad ++) from here

Procedure:- 

1) First of All decompile SystemUI.apk using apktool.
2) Now Goto res/layout folder.
3) Open status_bar_recent_panel_item.xml
4) Now in its line no. 2 add this code android:rotationX="-10.0"
5) Save it.
6) Also Open Status_bar_recent_panel.xml
7) In line no. 2 add android:rotationX="10.0"
8) Save it.
9) Recompile and push meta inf and androidmanifest.xml of your original apk to the modded one. 
10) Push it and set permissions to rw--r-r.
Tip:-Please sign the modded apk and make a nandroid backup before doing anything
How To Decompile APK

CREDITS
X.D.A Developers


Saturday 23 May 2015

APkTOOL FOR ANDROID

APKTOOL

A tool for reverse engineering 3rd party, closed, binary Android apps. It can decode resources to nearly original form and rebuild them after making some modifications; it makes possible to debug smali code step by step. Also it makes working with an app easier because of project-like file structure and automation of some repetitive tasks like building apk, etc.
It is NOT intended for piracy and other non-legal uses. It could be used for localising, adding some features or support for custom platforms, analysing applications and much more.

WHAT YOU NEED
1)Root access
2) files download them from here
3)Respect                    
4)Patience

How To Setup APK TOOL
1)Grab the latest version of apktool zip file from above link.
2)extract it to your internalsd/apktool/here.
3)done now use it for decompiling,recompiling modifying apk.

Some Commands of apktool and their Usage :- 
1.You need to install the file using the " IF " command.
for example-
  
                           "apktool if systemui.apk"
2.You need to  decompile or unpack the file by "d" command.
for example-
  
                            "apktool d systemui.apk"

3.You need to  Recompile or repack the file by "b" command.

                            "apktool b systemui.apk"
                 Tip - Don't Forget  To Sign The modified apk file
Credits
I am only Providing this information  to you.
Me [ https://www.facebook.com/developerace]
XDA-Developers
APK-TOOL Developers


Sunday 29 March 2015

How to Dual Boot

How To Dual Boot

WHAT YOU NEED:-

  • ISO images of both operating system [search on www.google.co.in/] 
  • Backup of your  Hard Disk Drive
  • Little Respect 
  • Brain
  • Download the ISO according to your architecture for ex- if u 32bit  windows 7 then downloads 32 bit ubuntu or another os which u want to install..
Lets Start :- 
There are two Methods For Installing Ubuntu :-
1. Inside Windows Safe Method No Data loss.
2.On Another Partition So That Each Time You Start You Have to Choose.

Method No :- 1


  1. Download Virtual Box From here
  2. Install it as Normal Software 
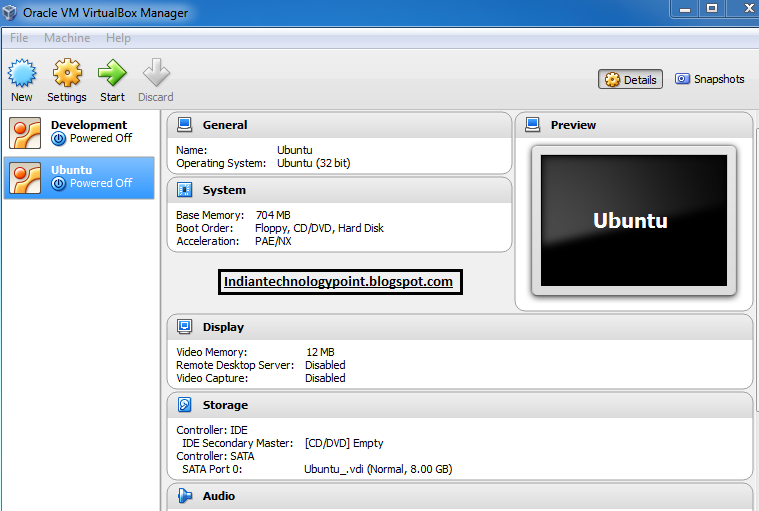
  3. Now Click on New Button 
     
  4. Now Write the name of the O.S you Want to Install.

                                     
5.Allocate the Ram Size you want to allot to the guest O.S (Advice 768 mb is enough)


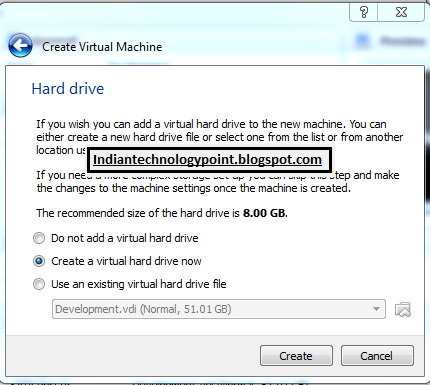
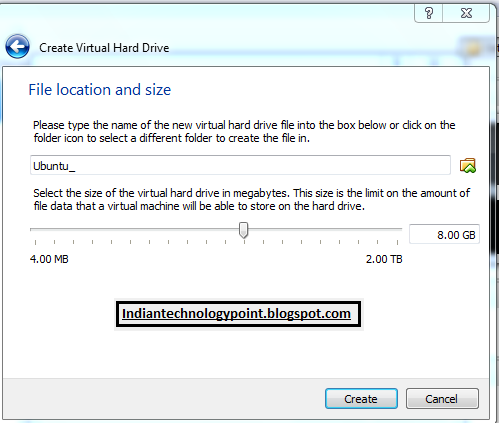
6. Now You Need to allocate the Size of Hard disk.(Advice-50 gb is enough)


7.Now You Will See A New Tab in the Left Panel.


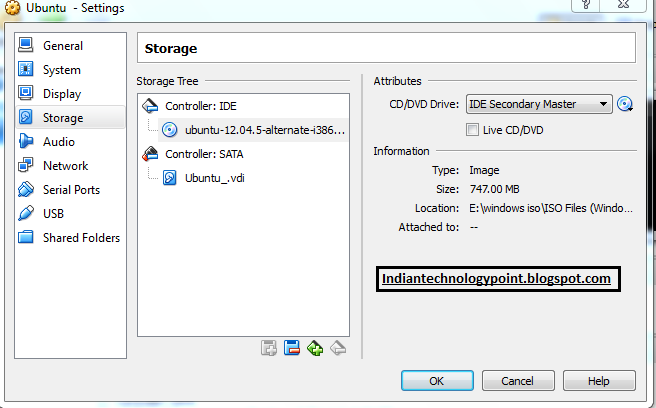
8.Now Click On Settings icon and navigate to Storage and click on the disk item in the right side and choose the downloaded ISO image to want to install (note only install the OS which u want to dual boot.


9.Now Click on start and install the OS dont worry your data is safe.


Method:-2  I will post it Soon... :)


Catch me on facebook.com- www.facebook.com/developerace